This is our Demo store. We do not accept any payment from here. If some one is asking about payment then contact us on mobile. 9935149636 Dismiss

ADD ANYTHING HERE OR JUST REMOVE IT…
  • Newsletter
  • FAQs
Select category
  • Select category
  • 8051 Projects
  • Accessories
  • Arduino Projects
  • Arduino Projects With Android App
  • Blynk App IOT Project
  • Electrical Projects
  • ESP32 Camera Projects
  • ESP32 Projects
  • ESP8266 Projects
  • Gsm Interfaced Projects
  • Mini Projects
  • Our TOP IOT Projects
  • PI PICO W Projects
Login / Register
0 Wishlist
0 Compare
0 items / ₹0.00
Menu
projectiot
0 items / ₹0.00
Browse Categories
  • ESP32 Projects
  • ESP8266 Projects
  • 8051 Projects
  • PIC Microcontroller Projects
  • Arduino Projects
  • Blynk App IOT Project
  • Our TOP IOT Projects
  • Arduino Projects With Android App
  • ESP32 Camera Projects
  • Electrical Projects
  • Mini Projects
  • PI PICO W Projects
  • Home
  • Shop
  • Track Order
  • Contact Us
  • About us
360 product view
    0%
    Click to enlarge
    Home Arduino Projects Smart Led Controller with BLYNK IOT
    Medicine Reminder With Telegram Notification
    Medicine Reminder With Telegram Notification ₹6,000.00
    Back to products
    Placeholder
    Agriculture Robot Using Arduino Nano ₹10,000.00

    Smart Led Controller with BLYNK IOT

    ₹6,500.00

    Weight 3 kg

    1 in stock

    Compare
    Add to wishlist
    SKU: AP-326224 Categories: Arduino Projects, Blynk App IOT Project Tags: Arduino, IOT, NODEMCU
    Share:
    • Description
    • Reviews (0)
    • Fill Form & Contact us
    Description

    1. Introduction

    Briefly describe the project’s objective: creating a smart street light controller with automatic charging based on day/night and user monitoring via an IoT app.
    Highlight the key features: automatic charging mode selection (solar/wireless), battery voltage monitoring, and remote monitoring capabilities.

    2. System Design

    Provide a block diagram illustrating the connections between Arduino Nano, NodeMCU, LCD module, LDR, voltage regulators, wireless charging modules, and the battery/solar panel.
    Briefly explain the function of each component:
    Arduino Nano: Controls overall logic and interacts with other components.
    NodeMCU: Connects to WiFi and enables communication with the IoT app.
    LCD module: Displays real-time sensor data (battery voltage, solar voltage, wireless charging voltage, LDR status).
    LDR module: Detects light levels to determine day/night mode.
    Step-down module (if needed): Regulates voltage from solar panel to appropriate level for battery charging.
    Voltage booster module (XL6009): Boosts voltage to charge the 12V battery.
    Wireless charging module pair (RX & TX): Enables wireless charging during night mode.
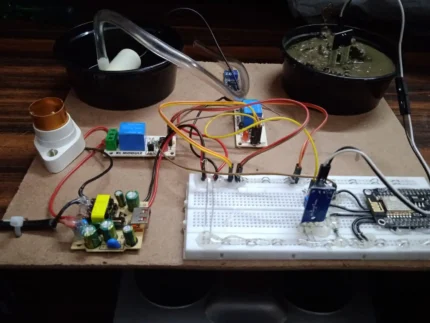
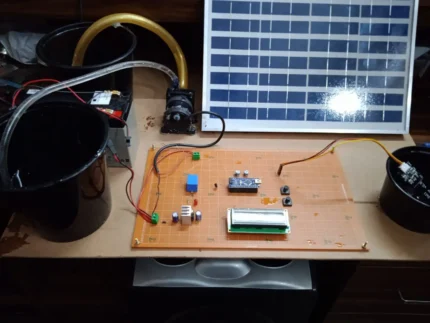
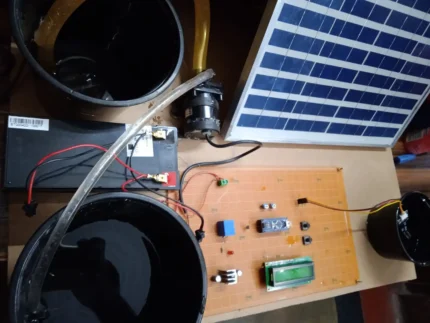
    3. Hardware Setup

    Detail the hardware connections between all components using pin numbers and a clear explanation.
    Include a wiring diagram or reference a standard wiring scheme for the XL6009 module.
    Specify the type of LCD module and its connection details (I2C, SPI, etc.).

    4. Software Development

    Briefly explain the programming languages used for Arduino Nano (C++) and NodeMCU (Arduino IDE or specific libraries).
    Outline the key functionalities of the code:
    Reading sensor data (LDR, battery voltage, solar voltage, wireless charging voltage).
    Implementing automatic charging mode selection based on LDR readings (solar in day, wireless in night).
    Controlling the voltage booster module (XL6009) based on charging mode.
    Sending sensor data to the NodeMCU for transmission to the IoT app.
    (Optional) Receiving commands from the IoT app for manual control (if applicable).

    5. Blynk App Integration

    Describe the setup process for the Blynk app, including creating a project and linking it to your NodeMCU.
    Explain the design of the user interface in the Blynk app:
    Displaying real-time sensor data (battery voltage, solar voltage, wireless charging voltage, LDR status).
    (Optional) Including controls for manual operation (if applicable).

    6. Testing and Results

    Outline the testing procedures you performed:
    Verifying sensor readings
    Confirming automatic charging mode switching
    Testing data transmission to the Blynk app
    (Optional) Testing manual controls (if applicable)
    Share the observed results and discuss any encountered challenges.

    7. Conclusion

    Summarize the project’s achievements and its potential applications (smart street lighting with automatic charging and remote monitoring).
    Briefly mention future improvements or modifications (e.g., adding motion detection for adaptive lighting control).

    Schematic_Smart-IOT-Led-Controller-With-BLYNK-Interfaced_2024-05-04
    Loading
    Reviews (0)

    Reviews

    There are no reviews yet.

    Only logged in customers who have purchased this product may leave a review.

    Fill Form & Contact us

    Loading

    You may also like…

    Add to cart
    Quick view
    Compare
    Add to wishlist

    Drain Alert for Sewage Treatment Plant with SMS & GPS Location

    Arduino Projects
    Rated 0 out of 5
    ₹6,000.00
    Add to cart
    Quick view
    Compare
    Add to wishlist

    Soil Moisture Controller using Blynk App

    Blynk App IOT Project
    Rated 0 out of 5
    ₹2,000.00
    Add to cart
    Quick view
    Compare
    Add to wishlist

    Soil Moisture Controller with Solar Panel

    Arduino Projects
    Rated 0 out of 5
    ₹4,500.00
    Add to cart
    Quick view
    Compare
    Add to wishlist

    Weather Monitor Using BLYNK IOT

    Blynk App IOT Project
    Rated 0 out of 5
    ₹2,800.00

    Related products

    Add to cart
    Quick view
    Compare
    Add to wishlist

    Pulse-Oximeter Using Arduino

    Arduino Projects
    Rated 0 out of 5
    ₹3,500.00
    Add to cart
    Quick view
    Compare
    Add to wishlist

    Room Calling Indicator Using Arduino

    Arduino Projects
    Rated 0 out of 5
    ₹7,000.00
    Add to cart
    Quick view
    Compare
    Add to wishlist

    Line follower Using Arduino

    Arduino Projects
    Rated 0 out of 5
    ₹3,000.00
    Add to cart
    Quick view
    Compare
    Add to wishlist

    Over Load Protector Using Arduino With GSM

    Arduino Projects
    Rated 0 out of 5
    ₹7,000.00
    Add to cart
    Quick view
    Compare
    Add to wishlist

    Obstacle Avoiding Robot Using Arduino

    Arduino Projects
    Rated 0 out of 5
    ₹3,000.00
    Add to cart
    Quick view
    Compare
    Add to wishlist

    Temperature Humidity Indicator Using Arduino

    Arduino Projects
    Rated 0 out of 5
    ₹2,200.00
    Add to cart
    Quick view
    Compare
    Add to wishlist

    Color Sorter Gripper Using Arduino

    Arduino Projects
    Rated 0 out of 5
    ₹11,000.00
    Add to cart
    Quick view
    Compare
    Add to wishlist

    Parking Distance Meter Using Arduino

    Arduino Projects
    Rated 0 out of 5
    ₹2,500.00
    2025 CREATED BY http://projectiot.in. PREMIUM PROJECT SOLUTIONS.
    payments
    • Menu
    • Categories
    • ESP32 Projects
    • ESP8266 Projects
    • 8051 Projects
    • PIC Microcontroller Projects
    • Arduino Projects
    • Blynk App IOT Project
    • Our TOP IOT Projects
    • Arduino Projects With Android App
    • ESP32 Camera Projects
    • Electrical Projects
    • Mini Projects
    • PI PICO W Projects
    • Home
    • Shop
    • Track Order
    • Contact Us
    • About us
    Shopping cart
    close

    Sign in

    close

    Lost your password?

    No account yet?

    Create an Account

    HEY YOU, SIGN UP AND CONNECT TO WOODMART!

    Be the first to learn about our latest trends and get exclusive offers

    Will be used in accordance with our Privacy Policy

    Shop
    0 Wishlist
    0 items Cart
    My account